How to install WordPress using cPanel and Softaculous
Hello and welcome to this new tutorial about WordPress. WordPress is a widely used free and open source content management system (CMS) to create websites. This platform is the required software to run our radio station (WordPress) theme, and can be easily installed in different ways. The standard old-school installation is based on a manual process, and requires to upload the WordPress files via FTP, create a database and manually configure the CMS.
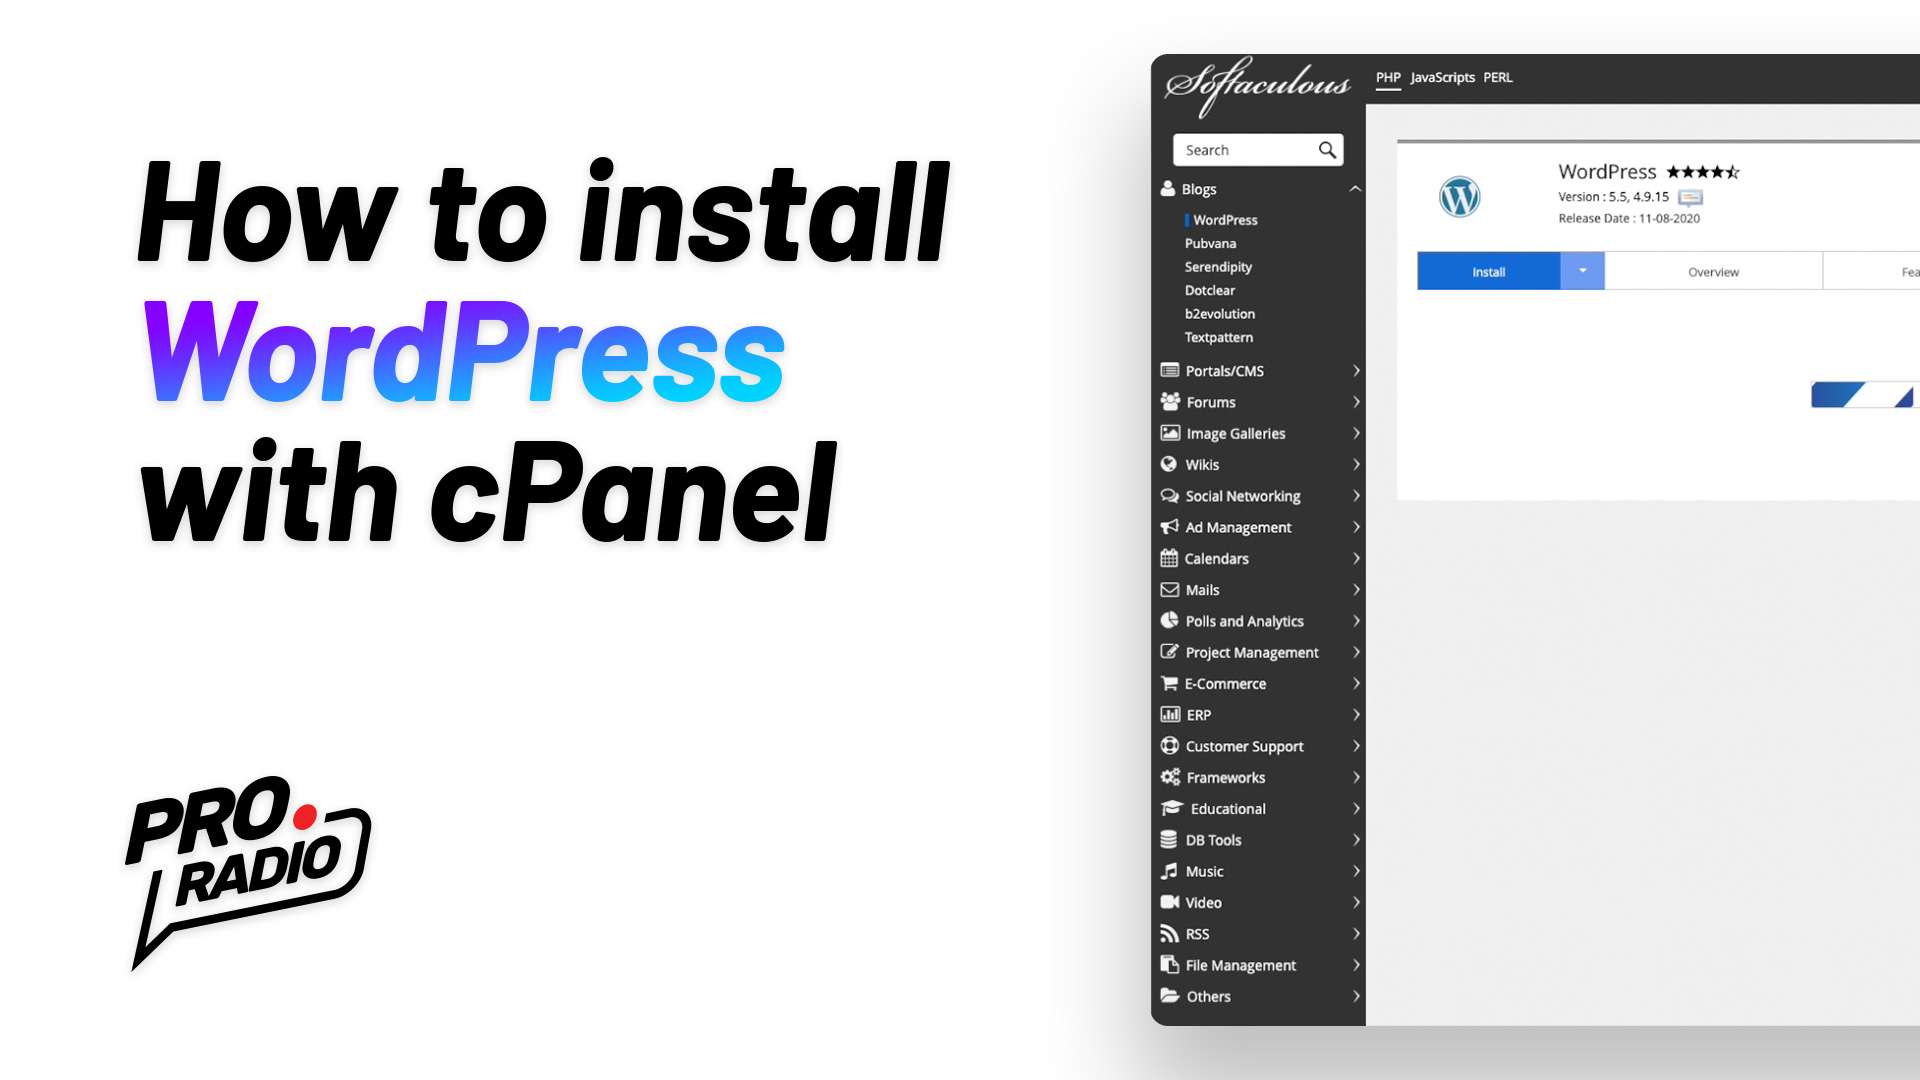
Nowadays fortunately we have a much faster option, that is Softaculous, usually provided within any cPanel hosting account. Softaculous is an App manager and allows to install and manage several popular CMS. Installing WordPress with Softaculous is much easier and is takes only a few clicks and fields compiling, allowing to skip the nerdy stuff that nobody likes.
In this tutorial we will show you how to install WordPress in the easy way, with Softaculous and cPanel, specifying how to correctly compile the different fields and which errors to avoid during the setup.
Even though you may be skilled and familiar with the manual procedure, the Softaculous installation process is infinitely more advantageous, because it allows to easily backup and restore an installation, recover a lost password, and keep track of every WordPress installation in your server, so we strongly recommend to use this app manager instead of choosing the classic manual procedure.
How to install WordPress using Softaculous
- Log into your cPanel management page using the credentials provided by your hosting company
- Search WordPress in the search box, you should be prompted with one or more options. Click on the Softaculous Installer icon.
- Choose WordPress and click Install Now
- Choose a domain. Important: if you want to use HTTPS, make sure also your streaming provider offers HTTPS connection.
- Directory: you can specify a directory. To install WordPress in the root of your site, delete any text from this field.
- Admin username: it will be the username for the new WordPress installation. Make sure to set something unique, not “admin”.
- Admin password: pick a strong password containing uppercase, lowercase, number and symbols.
- Make sure to copy your username and password in a safe place.
- Admin email: please make sure to double check your email address, to avoid being locked out of your website.
- Install the classic editor: the Pro Radio WordPress theme uses Elementor and you won’t need the Gutemberg editor.
- Install the Loginizer plugin: this is a good starting point for your website security.
- Database name: if you plan on installing multiple WordPress instances, you should use a databaase name easy to recognize, in case you want to backup or move it.
- Click Install and wait for the process to finish
- If you did any mistake, you’ll see a notification, and you can fix it to proceed.
- All done! Time to proceed to the Pro.Radio WordPress theme installation!
Transcript of the video:
Hello and welcome, to this new Pro Radio tutorial. In this video, you will learn how to easily install WordPress using cPanel and Softaculous. First of all log into your cPanel, and search for WordPress in the search field. If your cPanel has alternative software installers, like Installation or Applications, we recommend using the Softaculous version, as it allows easier backups, staging copies and management. So click on the Softaculous icon, and you’ll be in the installation screen. Let’s now click Install Now! At this point, there is a very important setting to choose: the protocol. If you want to have your website in HTTPS, which would be the best option, you should first make sure that also your streaming can be accessed via HTTPS. In fact, you cannot stream an HTTP radio inside of an HTTPS web page. If you have any doubt, just check the URL of your radio stream, and see if it starts with HTTP or HTTPS. At this point, you can choose the domain. If building a staging work website, you can choose a subdomain, instead of the main website URL. In this example, we will be using Testing! Dot pro: dot Radio. You can optionally set a sub directory, which we will now leave empty. So our website, will be accessible directly at the URL Testing! Dot pro: dot Radio. Then you get to choose your site name, and the site description. The site description is an optional information, and the Pro Radio WordPress Theme will not actually display it in the frontend. Please make sure you do NOT! Select: the multisite checkbox. Then set a username and password! Make sure to choose a strong one, and never use… “Admin”… as username. Compile your email address, making sure to spell it correctly. Then you can set the language for your website. Finally, you may want to enable the Loginizer plugin, to prevent hacking attempts to your website, and also we suggest using the Classic editor. In the advanced settings you can also set a custom database name, but you may not really need to dig into these options. Once done, wait for the process to complete. If any field was not compiled correctly, you will be able to go back, and fix it. When it’s completed, you can use the 2 links to view your website, and access your admin screen. Now your WordPress installation is ready, and we can install the Pro Radio WordPress Theme. See you in the next video!

You may also like


Copyright 2019-2025 ProRadio© Qantum Themes SL©